Temple of Zeus — The Assembly of the Gods

How to Draw (and use our mind powers for it)

OhNoItsMook

OhNoItsMookActive Translator
#1

Prelude

Powerofjustice's recent threadFull site ↗ regarding the concept of giving and taking, has allowed me to come to the realization that I have very much held back from providing the knowledge I possess in my area of expertise, to the forums for many years.

However, with the recent creation of this sub-forum of Art & Music, I may now finally have a place to contribute the knowledge and experience I've accrued over my years, towards helping our community learn and develop in my own field of passion, that being art.

Specifically, digital illustration of human characters, and backgrounds. Nevertheless, the same knowledge and fundamentals also apply to traditional art (pencil & paper, watercolor, markers etc), and even other genres of drawing (mechas, animals, probably...). Interestingly enough, most of us started on paper before moving onto digital art, and there are still many professionals among us who sketch on paper and then scan and finalize their art digitally.

As you may or may not have seen me before on these forums, please allow me to provide an in-depth and definitely not vague introduction before I commence the deluge of information I'd been anticipating to share here for over 4 years.

Mook, Artist.

Now that we've totally gone over the full details of my entire identity, let me explain to you the absolute fundamentals of art that a beginning artist must focus on, at the very start of their eternal adventure that is the expression of our emotions and soul. Many artists in the beginning may possess a strong desire to begin learning illustration, but do not know how, or where to start. Surely, they wouldn't even have a painting program or a digital illustration device for it.

However, as I mentioned earlier, mostly all of us started with pencil and paper, and since the fundamentals are the same, it will actually carry over into digital art, once you get past the initial potential discomfort of using a pen and tablet, if you ever choose to go digital.

If you happen to like RPG games, think of art like an online RPG. Everyone starts with default equipment corresponding to their class, and everyone chooses their own path. Some branch out to different kinds of art, like music, or literature. Even in those different sectors of art, there's many genres of it underneath.

For example, illustration: Western comic style, Eastern anime/manga style, human characters, robotic/mechanical characters, creatures, etc.
Music: Rock, Jazz, Orchestra, etc.
Literature: Horror, mystery, romance, etc.

Since we're all literal mages in real life here, let's just say we're generally the Magician class as artists. It's very suiting, too, since the entire idea of art is to manifest in reality that which we express emotionally and psychologically, and from the soul level. What type of Magician you want to attribute your artistic identity to, I leave that to you.

With that said, let me introduce you to some of the fundamentals that will form as a basis for everything you do as you progress in your art journey. Zevist is a very special mage class, and we have hidden, unique abilities that can help us in the acquisition of knowledge, and maybe even gain more EXP (and faster) compared to "normal" classes, or even "regular" mages...

The Fundamentals of Art  (The Plains of Beginnings!)

#1 - Gesture Drawing  (Slime) (Lv.1)

First and foremost, without exception, for the most part: Gesture/figure drawing. Figure drawing is the act of observing a pose from a photograph, and attempting to comprehend its forms of dynamism and movement through usage of the "line of action" (an imaginary line that runs through any pose, static or moving), and loose shapes such as circles and ovals to roughly represent parts of the body.

Understanding the flow of the human body in different poses from the very beginning, and how to capture it, ultimately already saves you from the first novice trap of trying to draw things without construction or dynamism.

The key to practicing and comprehending this, is to repeatedly perform figure drawing as a regular warm-up, under 2 minutes or less. As you become used to this process, you should aim to be able to mostly draw a loose pose of which the action you can visibly identify by its flows alone, within 30 seconds.

Here is an example depicting the concept of flow in poses.
Translation: What is the flow of the body?
(left) No flow
(right) with flow.
(Bottom text) Expressing the flow is important when posing!


(Source: Palmie.jp (https://www.palmie.jp/lessons/267)

There are many sites out there designed for artists to practice figure drawing. Personally, the two sites I've used for years where I have been able to effectively practice figure drawing, are Line of ActionExternal ↗, and PoseManiacsExternal ↗. The former uses real photographs, the latter uses anatomical models, which I'll mention again later in this post.

An example of using photographs as reference when practicing figure drawing and poses:


Source: Pinterest

(Personal experience: I remember in the beginning, my first sketch with zero fundamentals took 6 hours and looked like splattered shit. I used all my mana just to defeat a slime that only gave 1 EXP, basically. Don't be like me. Always start from fundamentals)

Unique ability usage: Activate your third eye and tap into intuition as you observe the poses, and "feel" the flow. Every one of us sees and starts drawing from different parts of the pose, and constructs it differently. One of the most crucial elements of learning is intuitively discovering a method that suits you, individually, and our abilities help us understand ourselves enough to find exactly which way works best personally.

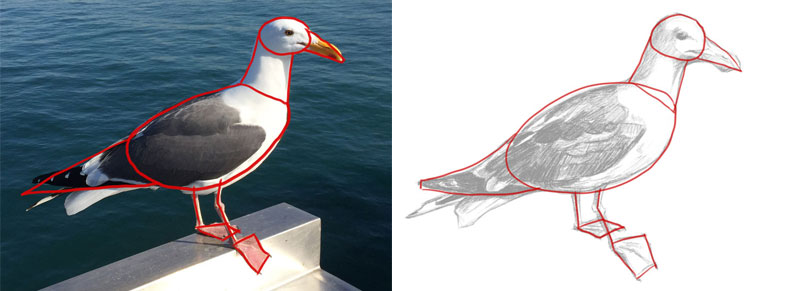
Also, understanding of gesture and shape applies to anything, not just humans:
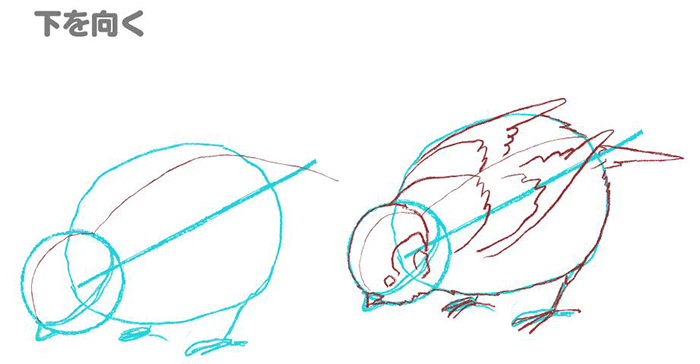

(Source: https://ichi-up.net/2019/30)

(Source: The Virtual Instructor)

#2 - Construction and 3d shapes (Rock Elemental) (Lv.2)

Here is an example portraying how the human body can be simplified into a combination of several different 3d shapes:


(Source: Clip Studio Paint tutorials)

The human body and any targeted subject, is constructed of complex forms that can be visually simplified and broken down into 3d shapes. For example, the head, torso and pelvis during the construction phase can generally be drawn as cubes, and the joints such as shoulders, elbows and knees simplified into spheres. The arms and legs, cylinders, and the hands and feet, as triangles, wedges or pentagons.

Once you understand how to visualize complex objects and structures as a combination of cubes, cylinders, spheres, cones and rectangles, and many other different 3d shapes, you can begin creating relatively comprehensible mannequins of humans, and anything else you wish to draw. As you become used to it, you'll realize most areas of the body or subject don't precisely conform to a certain shape. In these cases, like carving out a block, you gradually shape it into the part you intend to draw, as it begins to resemble your target more and more.

To familiarize yourself with drawing 3d shapes, try to draw all sorts of shapes and connect them on top or aside one another to obtain a feel as to how you might draw a real object in the future. Remember, everything can be simplified to a bunch of interconnected, stacked 3d objects. A closet, for example, is a rectangle with smaller rectangles for the handles. A door is a rectangle with a smaller rectangle and sphere for the doorknob.

Unique ability usage: After vividly observing the photograph of the subject (remember to use references), human or otherwise, close your physical eyes and use your astral sight to attempt to reconstruct what you just saw, as three-dimensional shapes. Entirely replicating what you see can be too hard at first and is also not the point here, so using your astral vision forces you to comprehend and construct something while also using both your creativity and intuition, as they tell you what stands out the most to you, and how to recreate it.

Construction will also help in visualizing things in perspective, which leads us to the next fundamental.

#3 - Perspective  (Wind Elemental)  (Lv.3)  (Arguably level 666 or something once you cross into advanced levels...)

Perspective is the construction of the surrounding environment in which the subject is depicted, and also the space and distance perceived based on what is shown to be nearer, and farther away to the viewer. ...Yeah. This is a monster that scales with your own level, so it will almost always be difficult regardless of your level of advancement.

For now, let's just talk about how perspective can be incorporated into drawing characters. Backgrounds and the like are for the next chapter zone.

Understanding perspective is fundamental in depicting your subject in both a convincing and visually appealing manner, as we begin to include how the viewer visually perceives the subject in space, and this can possess a major impact in the expressiveness and mood of the illustration. You may have heard of foreshortening, which is typically when part of the character seems to reach out towards the viewer, like their hand, or foot. This is already somewhat advanced usage of perspective on the character alone, excluding how perspective can be used for backgrounds and the like, too.

Similarly to film and photography, a character viewed from somewhat far away can create a feeling of distance, or isolation. Whereas a close up, perhaps diagonal shot of the character's face can be much more impactful and dramatic in conveying their emotions, and expression. This is one example of the usage of perspective to convey different moods.

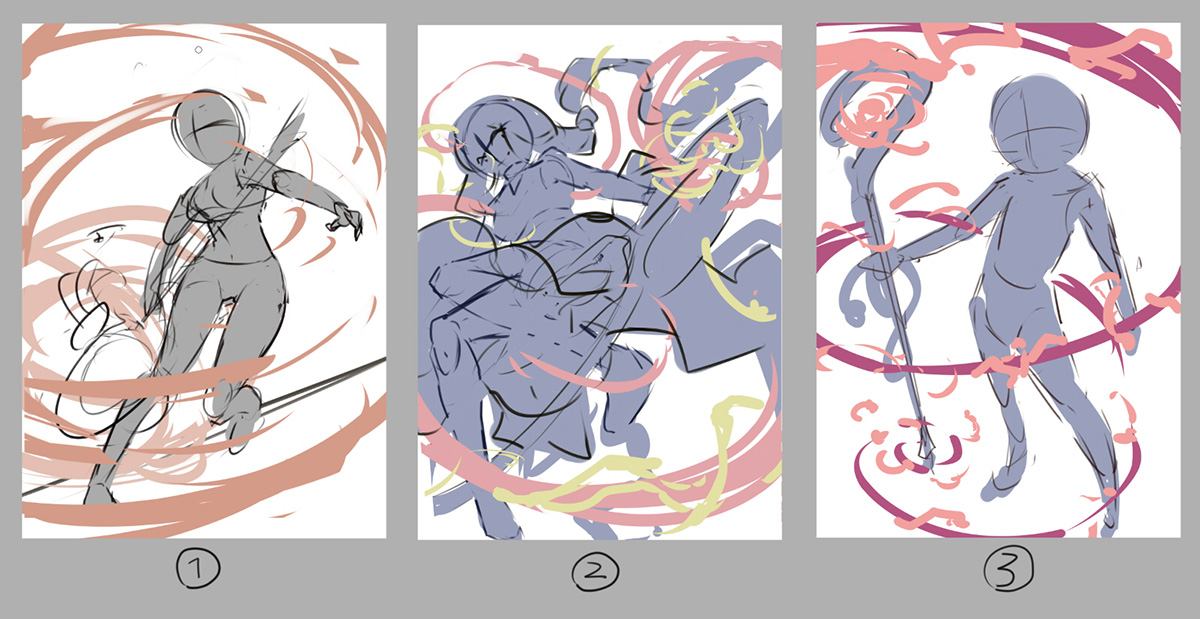
Here is an example displaying how different angles of the same general action and character, can create very different expressions depending on the artist's usage of perspective:

(Source: Wacom tutorials)

One way to familiarize oneself with incorporating perspective into one's illustrations, is to practice drawing 3d shapes and objects in different angles. Eventually, you will want to apply this to poses, and try to draw the same pose at 3 different points of view . This will also massively help later on, where you're drawing out random ideas and then choose 1 to finalize into a full illustration.

What we know as a "focal point" is the focus of the scene, towards which our eyes are drawn first and foremost, and what we wish to present to the viewer as the main subject of interest. This can be anything that serves as the center of attention amidst the rest of the scene. This could be the face, eyes, the weapon reaching out towards the viewer, etc.

In the case of my own art, it's often the chest and butt HAHAHAHA (oh, fuck...)

Unique ability usage: When you're drawing a pose from different angles, you can, once again, actually use your astral vision to surmise what something would look like from a different perspective. Not just see, but if you use Merging Consciousness, you can actually feel and experience anything you want.
This is really, really hard for normal people, but we've undergone the spiritual training to gain these abilities, which grants us a massive edge over anybody. (Something even harder is to feel yourself in the pose and sense where the centre of gravity leans the skeletal structure to determine the flow of the spine, angle of the hips, and positions of the feet, but that's some next level shit...)

Of course, you should still use references when you can, and a tip for poses is to use 3d models that you can turn around and see from other angles. Effective sites for this are PoseManiacsExternal ↗ once again, and surprisingly, SketchFabExternal ↗.

SketchFab is actually supposed to be used to purchase 3d models, but we're really just using it to inspect stuff and practice drawing. You can search for something, click something you like, and turn it around at different angles, zoom in and practice for all your studies.

#4 - Anatomy  (Wooden Training Doll) (level 4)

With the previous fundamentals, especially #2, construction, learning anatomy actually becomes a lot easier than it might seem. Some (many?) of us already have experience in physical training and/or martial arts, or even TCM (Hi, Blitz!), so we might be more familiar with the muscular system.

Regardless, when we research the muscular and skeletal structures of the human body for artistic purposes, we can simplify areas of the body into simpler shapes, that help us understand the structure to a more easily comprehensible degree. However, the difference with actually knowing anatomy, is that simplification is really for the purposes of establishing an initial understanding of the complexity of the human body. Most of us do not stop at the simplification, but carve and detail it further to resemble the muscles we intend to draw.

Here's an example of a color-coded portrayal of the muscles in the forearm. Previously, one might have simplified the forearm as a cylinder or bottle shape, but as we can see, there's a lot more going on inside.


(Source: Pinterest)

Now, you might be thinking, "Remembering muscles sucks. Do I really need to know anatomy to draw characters?"

Actually, no, you don't. One of us in my field was a woman who is a professional artist, and hadn't picked up an anatomy book until she was in college (but she still did in the end, right?). She had gone by shapes and construction entirely, and the rest of the fundamentals, without really knowing muscular structure or anything of the like. So technically, no, you actually don't need to know anatomy in order to draw characters (to an extent).

However, you are in my opinion crippling yourself when it eventually comes to situations where you might wish to vary the kinds of characters you draw, or the extents of detail you wish to draw their body at, which also depends on the genre and theme of your art.

More realistic styles such as those often seen in horror, action, and sexual art, where there is much emphasis on the body and details included, do absolutely require anatomical knowledge in order for the intended atmosphere or resonance to be conveyed in a convincing manner towards the viewer.

Even potentially more simple art styles, where the intention is to portray a fragile, cute character, the artist still possesses the actual anatomical knowledge most of the time, but specifically decides to simplify it for the sake of the target resonance of the character. If they didn't have the knowledge in the first place, every character would generally have the same body type, including characters of the opposite gender.

Basically, learning anatomy is for the sake of understanding the structure beneath that which you see, and will only further enhance your comprehension of whatever characters you intend to draw, adding more opportunities and variation. It's a very useful skill, and you could purposely choose not to use it, but having it and not using it is different than straight up not having it!

Since we're talking about drawing human characters, it would be to our benefit to understand the structure of the human body. When you feel like you have attained a comprehensive understanding of muscular anatomy, try studying the skeletal structure, as well. Muscles are connected to the skeleton, after all! This will also help in gesture drawing and posing, to understand how the muscles of the body stretch and turn, resulting in some very natural, beautifully dynamic poses.

PoseManiacsExternal ↗ has a function where you can toggle color-coded appearances of the muscles when viewing the anatomical models, allowing for easier visibility. We didn't have this back when I started, so make the most of it!

#5 - Lighting and Shading  Dark/Light Elemental (Lv. 5)

Another important fundamental in art, is the understanding of light and shadow. Lighting and shading allows us to establish vivid form and dimension in a subject, and it is what allows it to feel as though it truly looks to be present, despite it being in a 2-dimensional illustration. Essentially, it gives form and a sense of realism to something.

Here is an example of the basics of lighting and shading upon a sphere:


(Source: Pinterest)

Plainly, shadow is where light does not reach, but this is actually not entirely true. When light shines onto another surface or color in the immediate environment, the light that bounces off of it can actually seep into the shadow as a colored form of light, and this is called bounce light, or reflected light. Although black and white, you can see the slight, soft arc of light around the outer edge of the shaded area despite it being the opposite side of the light source. If you were to imagine a pearl on a metal surface, you would see a similar effect.

Now, since a sphere is round, the light that shines upon it will disperse across its curved surface, causing the shadow to resemble a gradient of light and shadow, rather than a sharp, abrupt transition as would occur with a cube.

To familiarize yourself with lighting and shading, practice drawing and shading several 3d shapes such as spheres, cubes, cones, and rectangles. You will quickly come to understand how light and shadow appear differently (or similarly) on each of these shapes, such as in the following example:


(Source: Pinterest)

As well as here:


(Source: Pinterest)

When you've become familiar with shading 3d shapes, you can move towards applying lighting and shading techniques onto characters, starting from the face, hair, and body. When you begin applying shadows to characters, you will discover the interesting effect that shading has on the overall impact, and mood of the expression and scene...

Although the examples from here on out are of digital art and coloring, the same elements of color, light and shadow apply to traditional art, as well. This is visible in many old, famous paintings of realistic portraits.


(Source: Pinterest)

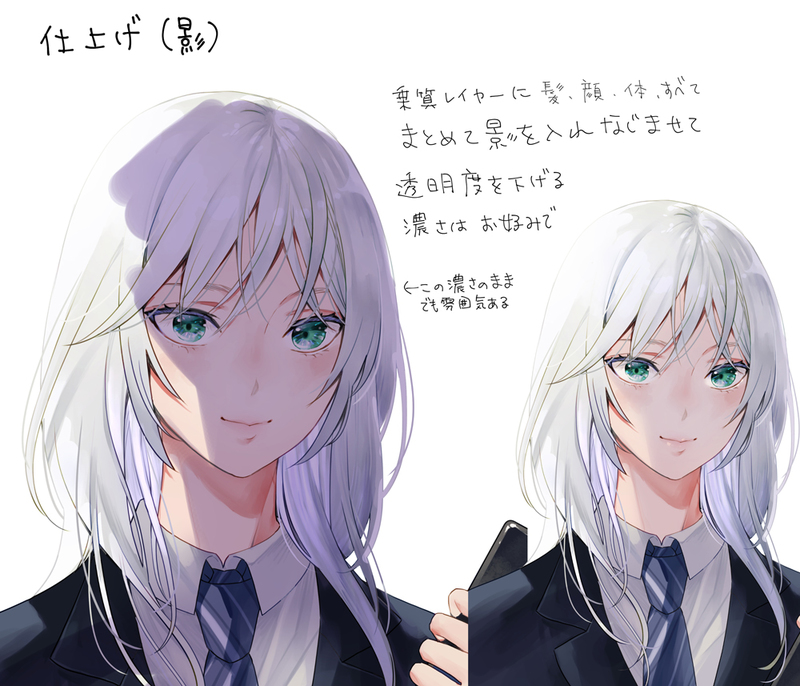
The following example is part of a guide on a Japanese site and includes some notes. I'll provide translation.

(The images are from right to left; right being before, and left being after applying shading.)

"On a Multiply layer, cover the hair, face, body, everything and blend the shading, then reduce transparency. Reduce level of shading wherever you like."
(arrow) "Reducing it like this over here, adds a sense of atmosphere" (which it does; the power of bounce light. That slight, lighter purple could've been blue to add a sense of general air or sky, but this is entirely up to the artist's intentions)

(Source: https://ichi-up.net/2020/15)

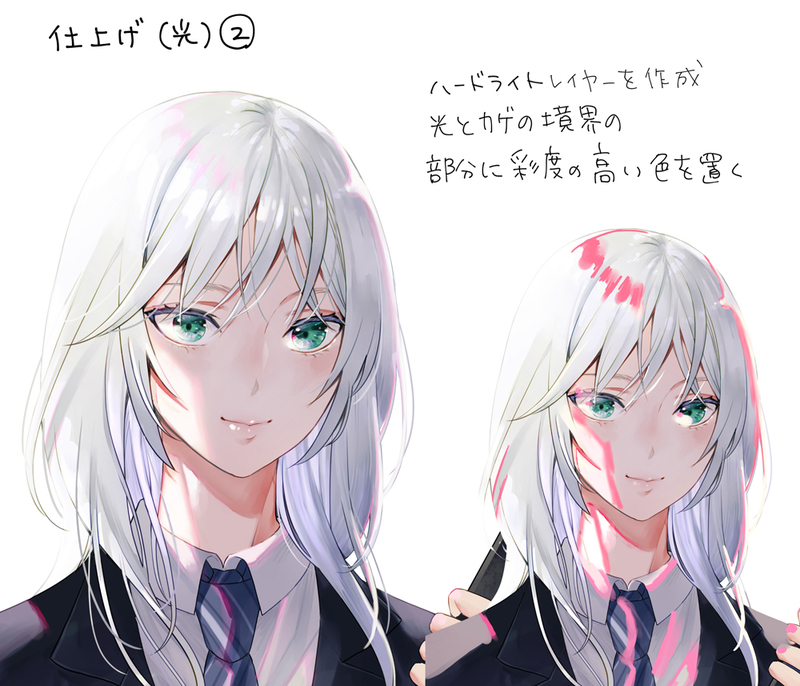
As well as the following.

"On a Hard Light layer, paint a color with high saturation (usually red for skin) on the boundary where light and shadow meet."

(Source: https://ichi-up.net/2020/15)

She's talking about SSS; Sub-surface Scattering. This is a lighting and coloring technique where when light seeps through a surface, it carries that subject's color through the shadow until a certain range. You'll see it when you put a flashlight against your hand and see the red of your flesh shine through the opposite end.

Example:


(Source: bgates87 (lmao))

As you can see, there's a highly saturated red, right at the boundary between where hard light hits, and the shadow begins. This does not always have to apply, especially when the light isn't that strong, but it is a huge factor in establishing a strong lighting effect.

It also doesn't have to be red; it's only red because the subject is human skin in the previous examples. Try to imagine what color would permeate the shadows of a blue water balloon, or on a tree surrounded by green or even orange leafs.

No unique ability usage for us that I can think of this time, as it's relatively straight-forward.

Now... onto my favorite part...

#6 - Color Theory (BOSS FIGHT!!)  Rainbow Slime  (Lv. 6)

Hahaha. Where do I even begin?

Color theory conveys the idea that certain zones of the color wheel, and particular color combinations at specific angles and ranges result in colors that will always be visually and emotionally pleasing to the human eye. It is almost objective, which doesn't exist in art, but if you pull off color theory from the beginning, something can look good even if the rest of the illustration looks like shit, basically. That is the power of this fundamental, and many people tend to overlook it, especially in the beginning.

In fact, we even have professionals who don't know color theory. Of course, it's an artist's decision whether or not to incorporate it into their art, and there are some cases where it doesn't work, such as when someone wishes to use darker, less saturated colors to convey more of a purposely dull and somber atmosphere. Nevertheless, it is still incredibly important to know, and among an artist's strongest weapons (and even stronger when it's us who wield it)

Allow me to provide a few general example combinations of color theory.
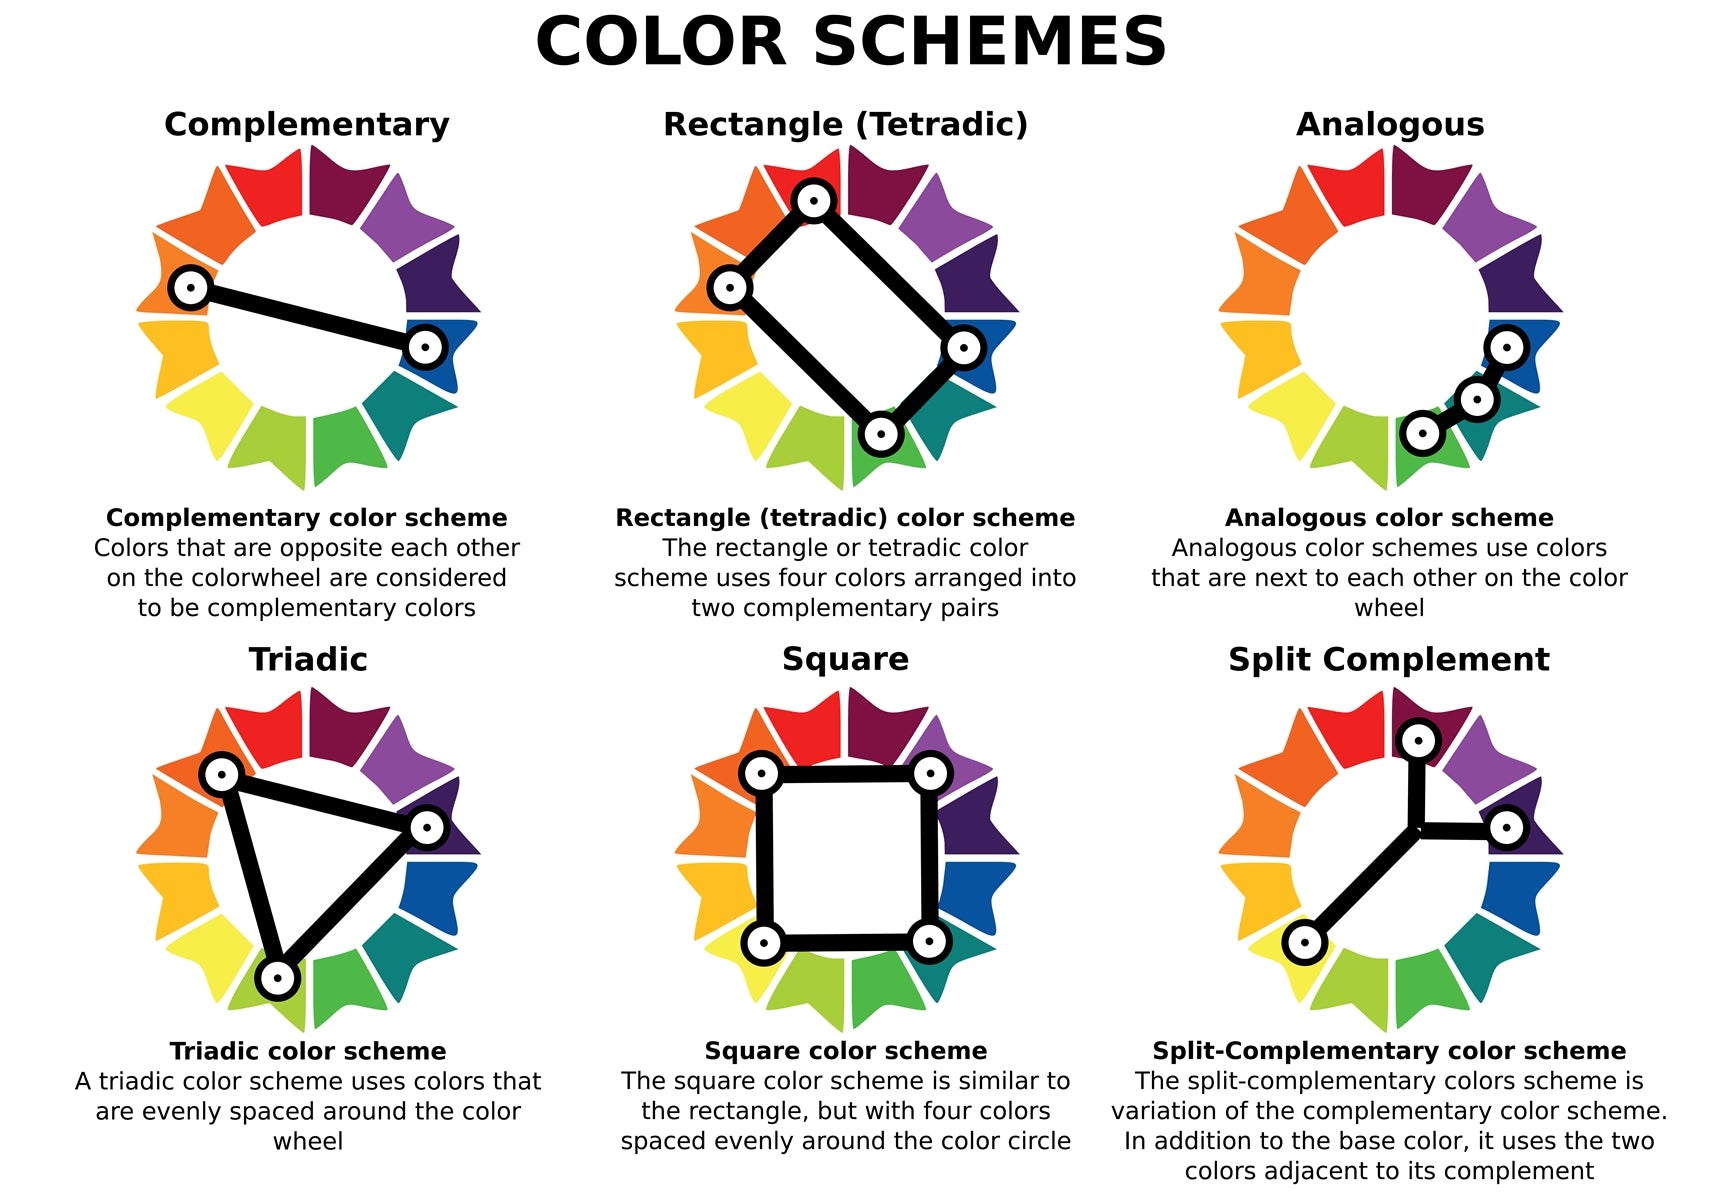

(Source: ...the web)

At first sight, it might be daunting to see how many different types of colors we can use in our art, for different kinds of moods and feelings. As we out of all people should know, different colors have different properties, and each resonate a particular feeling or quality. What's interesting, though, is that this can even be felt by normal humans, because all humans have a deep, primal, spiritual connection to colors due to our chakras and soul, as the soul is made of light and color is how light is broken down for our vision to perceive, all this be known or not to regular people.

Meaning you can evoke any intended atmosphere or feeling in your illustration through mastery over color theory, allowing you to basically control what emotions you want the viewer to feel when they look at it, through the usage of the colors in your drawings. It's fucking crazy if you think about it. Let this be a major upgrade to your skill level and stats.

Earlier, I showed several of the main color combinations. Truth is, even I haven't used half of those, and coloring is my strongest area. You can eventually try them all out if you wish, for experience, and see which one suits a particular scheme that you resonate with, but the bottom line is: you can get away for eternity with really just the Triadic and Complementary type. Or two others of your choice. That's all there is to it, for the most part.

For beginners, when you're shading and coloring your illustration (on a Multiply layer), as long as you shade with a color that is 1/3rd counter-clockwise to the base color, you're done.

Here's a simpler version of color theory that may be of benefit to those who prefer starting out with something easier:
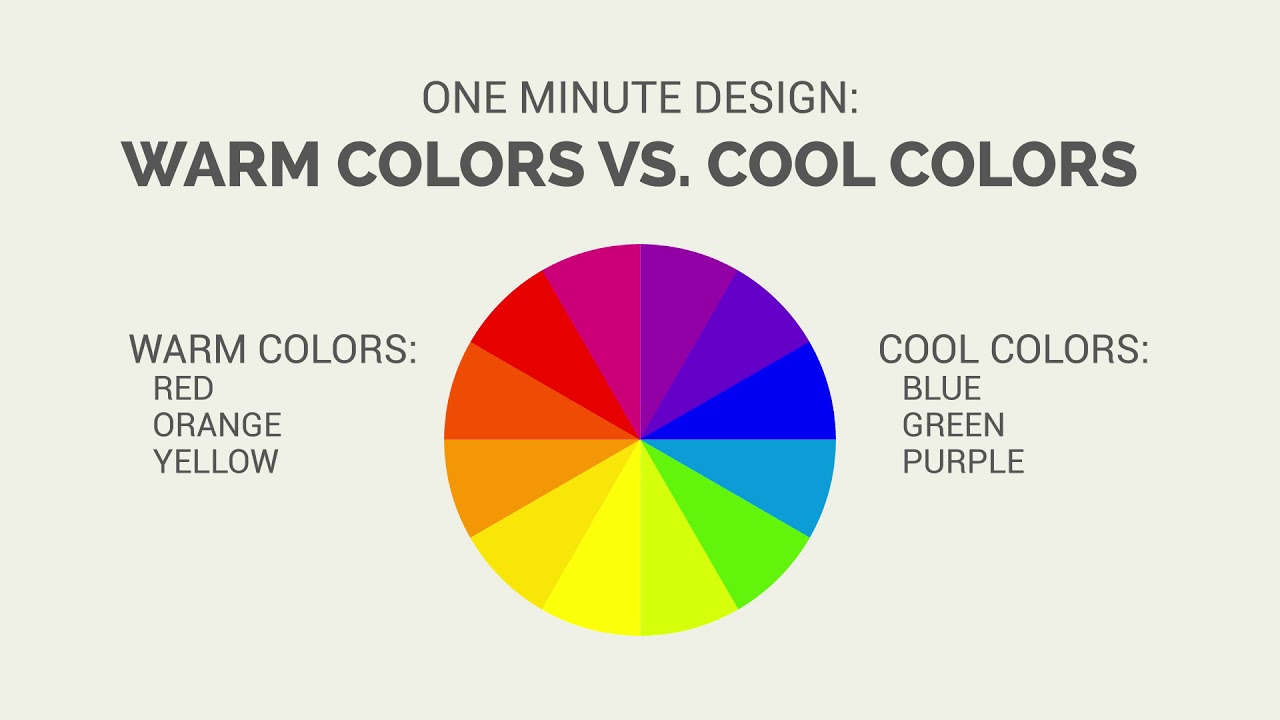

(Source: Youtube Thumbnail)

As you can see, we have warm colors, and cool colors. These are colors that our senses mostly attribute to what we perceive to be hot (red, yellow, orange), and cold (blue, green, and purple). This is the reason why red is considered lively, whereas blue can be sad or solemn.

Of course, the effects of a color depends on many different factors, such as the saturation level, surrounding colors, which "side" of the color (dark, mossy green towards blue, or bright, happy green towards yellow), but as I said, this is simply to establish some basic understanding for one who is just starting out.

Nothing is ever just it on its own, in art; everything is subjective, and can change as a result of anything else in the illustration.

Unique ability usage: Before coloring your painting, or starting your drawing for that matter, void meditate and begin to feel what kind of emotions you wish to spill into your drawing. The emotions you feel and the sensations that arise, will define what kind of color scheme and the levels of saturation, contrast, etc. you can use to convey such emotions to the fullest. I personally have had people physically jolt and experience chills from some of my most strongly colored works, as a result of the emotions I cascaded into it; it was tangible to even normal people.

Conclusion

As I mentioned in the beginning of this long post, many of us possess a creative desire to try drawing and painting, but might not quite know where to begin. I believe that the creative potential we possess as not just humans, but Zevists, must be allowed to be expressed through a medium that pertains to our desires, and allows us to evoke that which resides in our hearts and creative minds.

If that happens to be the path of illustration, I dearly, strongly hope with all my soul that one of you may pursue and find your path as an illustrator as a result of this post I made. From the effort I finally stuck into helping people with my knowledge here. I mean that with all my identity.

There are one or two more fundamentals I may have forgotten, but with these six, a beginning artist right out of the gate should be able to start working on developing everything they need. It is also important to note, that these fundamentals, all in combination are what will eventually perfect your artistic abilities.
Leaving or skipping them out will lead to breaks and gaps in your output, even as someone advanced and above; I've experienced this myself, and have had to return to fix these very basics I just laid out for new artists.

Although this might sound somewhat overwhelming, everything I wrote in this post, is actually only a glimpse of all else I still have to say. Remember, this was just a guide for beginners, LOL.

Upon defeating the Rainbow Slime, and grinding all the fundamentals for maybe a year (or two), I will welcome you to the next chapter, where much more awaits you as an intermediate artist by then. And beyond that, you can only guess what else...

Thank you so much for reading everything; it took me 10 hours to write all of this. May you advance in not just art, but spiritual powers as well, the very ones we can use to rapidly accelerate our growth in this field, using our mind's abilities.

If there is anything anyone wishes to ask me, or if there are already experienced artists who wish to request guides for higher level issues, please tell me about what struggles you may be facing in art, and I might create new threads on some of the most common walls we all face as artists.
Discussion

#21
OhNoItsMook wrote:View source

Thank you again, Afodo. I do hope that this appears in the library for my contribution to be immortalized.
I am indeed doing better now; I was working on releasing books and all sorts of hectic stuff.
I would love to, but since I have a very unique art style, I'll have to wait to post my art someday, when revealing ourselves publicly will not ruin our careers and figures. Wink

Twitter. Otherwise, Discord art communities where people are looking for artists to work on their projects. I think Instagram works very well, too.
Generally any place where people can see all your art in one place, or having a link to such.
But you have to have established a bit of a gallery or portfolio already, before anyone is able to consider you.

Hey, Mook. Have you ever heard of the book "Drawing on the Right Side of the Brain"? What do you think of it?

I was amazed when I tried one of the exercises. I'm one of those people who can barely draw a stick figure. But the exercise the author has you do involves drawing a portrait by Picasso, upside down. And when I did it, it came out just like the real thing. I never imagined I could do that.

She came up with all sorts of exercises to help loosen the grip of the left brain and let the right brain take the reigns when drawing, which is the whole theme of the book.

I never finished the book, but seeing your thread made me think of it again.

Thanks for sharing your perspective and knowledge as an artist.

OhNoItsMookActive Translator
#22
existentialcrisis wrote:View source

Hey, Mook. Have you ever heard of the book "Drawing on the Right Side of the Brain"? What do you think of it?

I was amazed when I tried one of the exercises. I'm one of those people who can barely draw a stick figure. But the exercise the author has you do involves drawing a portrait by Picasso, upside down. And when I did it, it came out just like the real thing. I never imagined I could do that.

She came up with all sorts of exercises to help loosen the grip of the left brain and let the right brain take the reigns when drawing, which is the whole theme of the book.

I never finished the book, but seeing your thread made me think of it again.

Thanks for sharing your perspective and knowledge as an artist.

Hey existentialcrisis, thank you for the recommendation. I have not heard of that book, but it sounds like it possesses some incredible methods.

Despite not having read the book myself, what you describe sounds somewhat similar to a procedure I forged for myself, which consists of partially letting go of the logical left side of the brain, in order for the creative subconscious to influence the illustration. This allows for the creative, emotional and intuitive right side of the brain, to permeate your art with qualities and discoveries previously unbeknownst to yourself.

Interestingly, even if you may have possessed an idea of what you'd like to draw beforehand, if you allow the right side of the brain to participate in the creative process, you will almost always experience soulful discoveries by accident, like a surprisingly good color combination, the unexpected expressiveness of the pose, a particularly beautiful design choice, anything.

This is usually the deeper meaning behind when artists advise you to not worry about things during the creative process, and just let things flow. That element of flow is the creative force of the subconscious coming out into your illustration, leading you to new discoveries, surprisingly comparable to how we work a pendulum, actually.

We usually apply logic for the calculative aspects and precision, like accurate anatomy, proportions and perspective, but in the end, art is most definitely 80% right-brained. An emotionally, intuitively led illustration will almost always magically feel more appealing than a stiff drawing straining for accuracy, regardless of experience level.
Though, as always, there must be some level of structure and balance between the two, so that it remains sufficiently convincing.

Thank you for expressing your thoughts and asking me for my own input. I hope this thread in general helps you in your learning and allows you to advance.

AristocraticDragon666Active Helper
#23
OhNoItsMook wrote:View source

Greetings, everyone! Over the past few weeks of working my ass off with my own illustrative abilities for 8-10 hours every day (this tends to happen when crunching deadlines are involved), I have come to a fantastic realization.

This thread is called "How to Draw", NOT just the Fundamentals of Art! Therefore, on top of the previous knowledge I have shared here, I will provide some helpful forms of information that will assist you more rather in the psychological side of art, that which precedes the initial physical act of pushing the pencil or brush, before you even hit the canvas at all.

The information below, too, will assist you in "How to Draw", beyond solely the fundamentals. With many of these, you can improve the quality of your art just by possessing the sole awareness of certain points, essentially providing solutions you can apply instantly.

We, as artists, physically(?) create that which we forge from our thoughts and emotions, i.e., subconscious, i.e., soul, in order to express our feelings to both ourselves and the world, and essentially influence the minds (and souls) of others affected by what we display. What we draw is, to a major extent, an extension of how we think and feel.

However, one of the issues is, no one in the beginning possesses the ability to draw things the way they hoped or visualized in their minds, even if you have strong astral vision. Because, the arm and hand is the literal physical catalyst we use to draw a depiction of what is in our minds and hearts, and it's not exactly perfectly synchronized when one has just started. How many times have you had the sickest fight scene in your mind, only for the poses or expressions to look like shit? Or the maddest scenery ever, but you gave up at merely at the horizon line?

These are simply some of the results of disparity between the physical and psychological sides of art, even if you've familiarized yourself with all the fundamentals listed earlier on in this thread. I am going to address some of these blockages, as well as some recurring concepts that seem to spread often in art circles, and how to overcome various difficulties, hopefully allowing you to surpass the barriers of which artists normally struggle to discover the reasons behind.

Let us commence the destruction of our limits.

This part of the thread assumes you've read and preferably already performed some of the original fundamentals to an extent, already.

Awareness Point #1 - Lines

If you've ever seen someone copy a drawing, you will have seen this happen, guaranteed (or we did it ourselves in the beginning; I did, too).


(Source: https://asakiriu.com/how-to-draw-a-line/External ↗)

Why does it feel like one's lines can sometimes feel wobbly, out of shape, and possess no direction, nor depth?

What happens here, is when an artist might not be aware of the concept of line technique. Line technique is a term that refers to the conscious awareness of how we stroke a line, that determines the smoothness, width, curvature, continuity and contour. On top of this, it also requires consistent repetition in order to seep the habit into our subconscious i.e., muscle memory.

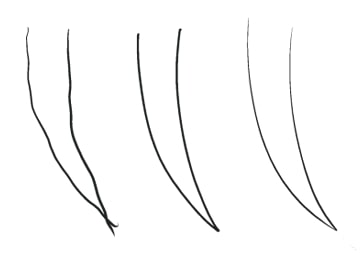
There are different kinds of lines, and different ways to emphasize particular qualities to them. Lengthy singular strokes with a pressure that trails off towards the end can feel elegant, smooth, and generally more professional due to the confidence in the stability of the line.

This kind of awareness of strokes, in combination with line techniques such as line weight, line breaking, to add depth, emphasize roundness, etc., will provide immense assistance in the overall quality of your line art. You can see how the top part of the character's head possesses such depth, due to the outer lines at the tip breaking to suggest the origin point of the hair, as well as the beginning of the bangs. You'll see this same effect suggesting the seams of the sleeves on the character's uniform.

An easy rule to go by, is thicker lines = more emphasis, or closer to viewer (when perspective is applied). Try to go over the lines again and press harder to apply emphasis in any desired area. This is a technique called line weighting, and erasing it a little to create roundness or lightness, is called line breaking.


(Source: https://oekaki-zukan.com/articles/19811External ↗

The above provides another example, though, generally, it's actually the upside-down that happens for hair, as the tips of hair strands (especially the bangs) are often depicted with such an effect to frame the eyes, or suggest lightness at the ends.

At the same time, the left example is one depicting the absence of such techniques instead, resulting in wobbly, unstable lines. There's also the fact that the lines at the bottom edge intersect, when it's supposed to be the end of the shape.

Now, I'm going to hit you with my biggest gripe ever that every beginning artist tends to do, for some reason. I have to emphasize this, just so our brethren do not do this (don't worry, I did it once or twice too in the very very beginning)

Please, for the love of our serpent, do NOT do the following:

"ThtHtHtHAt'S ReaLLY GoOooOOD!" - All the peers you showed your copy/traced drawing to, who most likely don't know anything about art.

Despite it not being a precise 1:1 copy, you can still see the appalling lack of technique in the lines; 99% of the time this is a beginner copying something else, as this always results from a lack of knowledge and real practice of fundamentals. Left is original, right is imitated.

These kinds of lines are sometimes called "chicken scratches", or I personally call it chicken feet syndrome. It's when, as a result of no knowledge of line technique, instead of drawing normal strokes, you create many, short, scratchy lines, resulting in jagged, unbalanced, and "hairy" lineart. You might have to right click the image and open it in a new tab to see what I mean. It's especially visible in the hair and headset, here.

This is the hallmark of an early novice who simply just copies after a drawing. Some people seem to do it to "learn", but there are much, much stronger methods to understand how to observe and construct, rather than merely copy something one sees. Such understanding is obtained through proper incorporation of true fundamentals, as is the pure core of this entire thread.

NEVER. EEEEVER. EEEE NNENNNNENENE NEEEEVER DO this, I WILL find you!!

Conducting this error on an original, non-copied piece is simply an occasion of unawareness, though. We're all here to learn, and I'm here to tell you. Let's continue!

Awareness Point #2 - Excessive Ambition

This might be an interesting one, and kind of addresses a hypothetical circumstance I hinted at in the beginning of this post.

When we're beginners (or, actually, this can happen at any level), we tend to want to draw the biggest, coolest scenes that we're capable of. However, that's the whole deal; our own capability. The scenes that we are able to visualize in our minds, will not exactly look the same as when we draw it in front of us. Hell, even magick doesn't always come out the way we might've expected, lol.

When it comes to art, we, too, must know our own level of ability. If you have the perfect idea of how a scene or character looks like, but you don't possess the actual expertise to depict it enough to "do it justice", you may face severe self-discouragement and difficulties during the illustrative process. The reason this occurs, is because you know precisely how you want it to look like, but your absence of appropriate experience prevents you from forming the idea right before yourself.

It makes you feel worthless, incapable, like you hold no potential, and will likely result in you abandoning canvas after canvas, because nothing you ever draw ends up the way you wanted. You will inevitably encounter one or more of this type of artist when you start building relationships with other illustrators, lol.

However, you, yourself shall not become one such individual! One method to assist in preventing this, is to simply expect nothing. Possess the desire to illustrate your desired idea, but hold no particular image as to how you precisely wish for it to look. Be open to developments as you go, and ideas that enter your mind, insofar they properly contribute to the scene and you can manage them.

In fact, this is where gathering and observing many reference photographs should aid you in constructing a general outlook of the pose, scene, and any other elements.

DO NOT use inspirational art from superior illustrators as reference here. It will likely reinforce the sense of incapability and auto-denigration addressed earlier, in that you will realize your own art will not come out at the same level of quality as what you're looking at. Consuming it when you're not drawing is beneficial for (sub)conscious input, though.

Everyone wishes to draw their ideas at the utmost level of their ability, but as a novice, one simply does not possess the amount of experience that professionals do, nor has one yet conducted the immense amount of work it had taken for an expert to reach their present skill level.

Furthermore, I do not suggest attempting techniques and calculations that are evidently too advanced, such as 3-point perspective in birds-eye view of fantasy staircase labyrinths, or some other wind-warping stuff. I'm personally acquainted with one professional who has been drawing backgrounds for over 10 years, and STILL takes 30 hours per piece, given every single one possesses otherworldly quality. One of my other inspirations also takes about 30 hours for a single character drawing, and these are all professionals.

Although it is of vital importance to challenge oneself often, one must gauge their own level of ability as to not find oneself way in over their head. If you wish, you may set a limit of a few hours for yourself, likely 3-4 hours total for a piece is what I'd recommend for novices. This should not only encourage you to draw more resourcefully with your current knowledge, but also develop gradual speed and familiarity with the illustrative process, overall.

I know there are times we spend 20 hours on a drawing and think it's incredibly good due to the amount of effort we expended, but when we improve after a few months, only then do we see how bad it actually was. This is what happens when you overdo an illustration beyond what you were capable of. Past a certain point, you can't improve it even if you spend longer; it's like diminishing returns. I think I mentioned earlier in this thread how I once felt super good about my very first sketch I had spent 6 hours on, but it was actually complete trash.

Let us spend our effort wisely.

Awareness Point #3 - The Bigger Picture (literally)

Tell me, how many times have you drawn super zoomed into one particular area of a character, completely satisfied with that part, only to reach the hand and completely suck for the next 2 hours and ultimately stop? NEVER AGAIN!

What happens when we draw zoomed in from the start, is we begin to hyper-focus on merely one section of a larger scene, unless you're seriously conducting isolated practices like hands only, or feet only. Similarly to figure drawing mentioned in the original post of fundamentals, we must try to capture the general scene before committing to focusing onto a particular area of the body.

What we can do, and this may take some familiarization, is to draw only at full view of the canvas. This shouldn't be a problem for traditional artists, because the paper is all that's there, but in digital art we can manipulate the canvas size over and over, and zoom in as far as 3,200% or so, at least on Clip Studio Paint. I have an upper-intermediate level pupil who often hits Ctrl+Z at least 10 times, just to draw a tiny line that isn't even visible once you look at the full picture. Please don't become like this!

For example, consciously try to fit the entirety of the pose, scene, etc. into what you can see in full view, at 100% visibility. There should be a magnifying glass icon near the Navigator of whatever illustration software you're using to see the %, or at least the entire canvas should fit to screen.

Squint your eyes to check if the proportions, composition, colors, values, lighting and shading, and core fundamentals are all visibly distinguishable, before you sink into the whirlpool of adding details. Later on, when you've established the full-scene composition, you can crop the canvas to frame a particular part of the character, and work on completing the illustration from there.

Another important thing to note, is that if you were to work on tiny details while zoomed in, chances are no one will even notice such small additions upon normally viewing the full illustration at 100% (let alone even further away, like 75%, 50%), on any platform you post. Even less people have the attention span to even hang and click to check out your work in full resolution, anyway, so you MUST be aware of how it looks from "far away", at a small resolution.

Here is an example of one illustration that I would consider very clear, and visually comprehensible even at a small, zoomed out view.

The initial dynamic pose, framing of the character, the contrast of black and white against a pale green background, the strongly saturated blue/yellow/red band-aids as accent colors, and perspective of the foreshortened chains directing the focal point towards the face, MmMMWPHFHF, that's the SHIT!! And this is all visible at this size.

Full imageExternal ↗ (and it's STILL not the original resolution, because you have to be logged in!! Damn!)

The coloring, lighting, shading, dynamism, etc. of an illustration have to be able to catch one's attention at the size of an embedded Twitter image, viewed from the Timeline, or from the browsing section of any platform where art is visible at thumbnail size. Make that shit stand out to all those idly grazing cows on their phones in the train. Save Japan with me, please, lmao.

The bottom line is, make sure all parts of the illustration are initially visible and distinguishable at a glance, from far away, and do not waste time on small details before the former is fully established.

Particular fundamentals such as color theory and lighting/shading alone will help immensely with this. Though, as always, try to incorporate all fundamentals in conjunction with one another; you WILL feel it, and both regular people and other artists WILL be awestruck with the sense of professionalism in your art.

For manga artists, where coloring is not involved, you can still consciously calculate where to utilize contrast between black and white to create eye-catching illustrations, along with other special techniques to compensate for the absence of color, but that's a specific sector of art with unique methods. I could delve into this in a new post in the future, if anyone wishes to ask me here regarding this, as it's especially my territory.

Awareness Point #4 - Visual Reset

Working on an illustration for hours on end on the same day comes as a result of great passion, and displays a drive to pursue that which you love. You will certainly feel very good about your efforts as a result of such levels of energetic expenditure, and a situation as such may occur:

"Finally aced the face after much research, practice, and tutorials! Love the way it looks after 4 or so hours."

"Time to move onto the hands! Alright, this looks great for now. I'mma post it as it is."

*Two days and several users' comments addressing the anatomy of the hand/wrist later*
"OH MY gOD, FUCK!"

(Full image, by the wayExternal ↗)

If you're working on an illustration for (many) consecutive hours, you will develop something akin to tunnel vision, in the sense that you will not see what is wrong with your drawing until you step away for a while, and return to it after a day or so.

Although it varies between levels of expertise and reflective ability, I strongly suggest achieving ample hours of deep sleep to reset before you tackle your illustration again with fresh view. This should assist you in your own ability to reflect, but beyond that, you must still receive the feedback of other artists of similar, or preferably higher level.

One safe habit I strongly recommend, is if you're drawing into the night and finishing up a drawing before bed, DO NOT publish it when you had just "finished" it. Send it to your illustrator peers for them to check, go to sleep, check their responses the next day and adjust any glaring mistakes noted by them as much as you can.

Although I had chosen an example of intermediate level art here, this particular occurrence actually happens to illustrators of higher calibres, too, including professionals. Look at Snowstorm Sivir from League of Legends, for example. Have you seen the waist in that? Taffy rib cage or something. That shit went through the art development and publishing phases with teams of appointed experts?

The following presents a case where, despite several fundamentals present, and particularly coloring and shading executed at professional level... one error in another fundamental (proportions) can negatively impact the impression of the entire piece.


SourceExternal ↗

One's illustration could possess beautiful atmosphere, lighting and shading, coloring, composition, etc, but if the hand is that small in comparison to the head, and the thoracic cage and waist continue that far down, it can become jarring to the rest of the scene. Unless one does not notice, but they will likely not unsee it, once they do.

It seems to happen in all sorts of areas of life, where we had thought something was fine until we return to it in the future, only for us to cringe at it even though we thought it was completely fine at the time. Does that sound familiar? Sure as hell does to me.

Within the context of art, however, this is why it is of crucial importance to display your works to other artists. NOT your friends and family, who will feed you the canned classic of "ThAt's reALLLy GoOoOd", but other illustrators, or otherwise observant and eloquently constructive individuals, who may be able to point out things that might've eluded you.

Even lower level illustrators may be able to point out flaws in one's art, given they do not excessively nitpick after only watching a couple of Youtube videos, but that's a different topic.

You as the creator, see something much different than those who view it as an audience. You must understand how your audience perceives and interprets your creations, in order to not only obtain insight of others' points of view that might have differed from your own, but also to learn how what you put into your work affects those who observe it.

Now, there is a bit of a crazy phenomenon that might occur, even if you've shown your illustration to a number of different people who all say it looks fine. To relate a personal experience, there was a time when I had drawn all day and even incorporated my earlier advise of taking some time away from the drawing to refresh vision. It was a drawing that possessed strong focus on the character's hand, but there was other stuff going on in the illustration, too, so any errors were easily overlooked. Everybody loved it without any form of critique.

A few months later, I receive a comment from one of my friends, "....Six fingers O_O". MONTHS later! Neither I, nor several hundred others up until that point, seemed to have noticed the fact that the character's hand I drew had six goddamn fingers. It was definitely not intentional, and I have no clue how the hell I missed it, or no one had told me, let alone for that long!

This simply goes to show that even if you have your art evaluated and checked by others, there is always a degree of error that you must both discover, and resolve on your own. It just happens to be that a strongly effective way of receiving feedback, is to present your art to those who understand how to provide comprehensible, ethic forms of feedback.

Conclusion

That seems to be all that I can currently think of, regarding points of awareness that we can immediately (or gradually, for some) incorporate in order to see rapid evolution in our art, and how we and others perceive it! As usual, I expect myself to have forgotten a few more important things here and there, but this should enlighten our developing artists a little more, for the time being.

Additionally, if you notice I may have sounded slightly more critical or abrasive this time, it may be because this particular post already assumes the reader has conducted an ample extent of practice with all other material previously provided in this thread. As we enter higher levels of art, I expect more of you! Though, I will try to choose softer, more euphemistic forms of expression if the way I articulated myself this time turns out to become an obstacle to one's learning.

I shall await further comments and inquiries from anyone here at any skill level regarding art. Well, then, until next month, when the matter of me meeting piercing deadlines has been resolved.

This is a very useful and beautiful post (y)
Thank you very much 😍

Dragonheart666
#25

This is AMAZING! ❤️

Lightning_Puma
#26

Thank you for making this! :)

Deshasya Shasakah
#27
OhNoItsMook wrote:View source

Prelude

Powerofjustice's recent threadFull site ↗ regarding the concept of giving and taking, has allowed me to come to the realization that I have very much held back from providing the knowledge I possess in my area of expertise, to the forums for many years.

However, with the recent creation of this sub-forum of Art & Music, I may now finally have a place to contribute the knowledge and experience I've accrued over my years, towards helping our community learn and develop in my own field of passion, that being art.

Specifically, digital illustration of human characters, and backgrounds. Nevertheless, the same knowledge and fundamentals also apply to traditional art (pencil & paper, watercolor, markers etc), and even other genres of drawing (mechas, animals, probably...). Interestingly enough, most of us started on paper before moving onto digital art, and there are still many professionals among us who sketch on paper and then scan and finalize their art digitally.

As you may or may not have seen me before on these forums, please allow me to provide an in-depth and definitely not vague introduction before I commence the deluge of information I'd been anticipating to share here for over 4 years.

Mook, Artist.

Now that we've totally gone over the full details of my entire identity, let me explain to you the absolute fundamentals of art that a beginning artist must focus on, at the very start of their eternal adventure that is the expression of our emotions and soul. Many artists in the beginning may possess a strong desire to begin learning illustration, but do not know how, or where to start. Surely, they wouldn't even have a painting program or a digital illustration device for it.

However, as I mentioned earlier, mostly all of us started with pencil and paper, and since the fundamentals are the same, it will actually carry over into digital art, once you get past the initial potential discomfort of using a pen and tablet, if you ever choose to go digital.

If you happen to like RPG games, think of art like an online RPG. Everyone starts with default equipment corresponding to their class, and everyone chooses their own path. Some branch out to different kinds of art, like music, or literature. Even in those different sectors of art, there's many genres of it underneath.

For example, illustration: Western comic style, Eastern anime/manga style, human characters, robotic/mechanical characters, creatures, etc.
Music: Rock, Jazz, Orchestra, etc.
Literature: Horror, mystery, romance, etc.

Since we're all literal mages in real life here, let's just say we're generally the Magician class as artists. It's very suiting, too, since the entire idea of art is to manifest in reality that which we express emotionally and psychologically, and from the soul level. What type of Magician you want to attribute your artistic identity to, I leave that to you.

With that said, let me introduce you to some of the fundamentals that will form as a basis for everything you do as you progress in your art journey. Zevist is a very special mage class, and we have hidden, unique abilities that can help us in the acquisition of knowledge, and maybe even gain more EXP (and faster) compared to "normal" classes, or even "regular" mages...

The Fundamentals of Art  (The Plains of Beginnings!)

#1 - Gesture Drawing  (Slime) (Lv.1)

First and foremost, without exception, for the most part: Gesture/figure drawing. Figure drawing is the act of observing a pose from a photograph, and attempting to comprehend its forms of dynamism and movement through usage of the "line of action" (an imaginary line that runs through any pose, static or moving), and loose shapes such as circles and ovals to roughly represent parts of the body.

Understanding the flow of the human body in different poses from the very beginning, and how to capture it, ultimately already saves you from the first novice trap of trying to draw things without construction or dynamism.

The key to practicing and comprehending this, is to repeatedly perform figure drawing as a regular warm-up, under 2 minutes or less. As you become used to this process, you should aim to be able to mostly draw a loose pose of which the action you can visibly identify by its flows alone, within 30 seconds.

Here is an example depicting the concept of flow in poses.
Translation: What is the flow of the body?
(left) No flow
(right) with flow.
(Bottom text) Expressing the flow is important when posing!


(Source: Palmie.jp (https://www.palmie.jp/lessons/267External ↗)

There are many sites out there designed for artists to practice figure drawing. Personally, the two sites I've used for years where I have been able to effectively practice figure drawing, are Line of ActionExternal ↗, and PoseManiacsExternal ↗. The former uses real photographs, the latter uses anatomical models, which I'll mention again later in this post.

An example of using photographs as reference when practicing figure drawing and poses:


Source: Pinterest

(Personal experience: I remember in the beginning, my first sketch with zero fundamentals took 6 hours and looked like splattered shit. I used all my mana just to defeat a slime that only gave 1 EXP, basically. Don't be like me. Always start from fundamentals)

Unique ability usage: Activate your third eye and tap into intuition as you observe the poses, and "feel" the flow. Every one of us sees and starts drawing from different parts of the pose, and constructs it differently. One of the most crucial elements of learning is intuitively discovering a method that suits you, individually, and our abilities help us understand ourselves enough to find exactly which way works best personally.

Also, understanding of gesture and shape applies to anything, not just humans:


(Source: https://ichi-up.net/2019/30External ↗)


(Source: The Virtual Instructor)

#2 - Construction and 3d shapes (Rock Elemental) (Lv.2)

Here is an example portraying how the human body can be simplified into a combination of several different 3d shapes:


(Source: Clip Studio Paint tutorials)

The human body and any targeted subject, is constructed of complex forms that can be visually simplified and broken down into 3d shapes. For example, the head, torso and pelvis during the construction phase can generally be drawn as cubes, and the joints such as shoulders, elbows and knees simplified into spheres. The arms and legs, cylinders, and the hands and feet, as triangles, wedges or pentagons.

Once you understand how to visualize complex objects and structures as a combination of cubes, cylinders, spheres, cones and rectangles, and many other different 3d shapes, you can begin creating relatively comprehensible mannequins of humans, and anything else you wish to draw. As you become used to it, you'll realize most areas of the body or subject don't precisely conform to a certain shape. In these cases, like carving out a block, you gradually shape it into the part you intend to draw, as it begins to resemble your target more and more.

To familiarize yourself with drawing 3d shapes, try to draw all sorts of shapes and connect them on top or aside one another to obtain a feel as to how you might draw a real object in the future. Remember, everything can be simplified to a bunch of interconnected, stacked 3d objects. A closet, for example, is a rectangle with smaller rectangles for the handles. A door is a rectangle with a smaller rectangle and sphere for the doorknob.

Unique ability usage: After vividly observing the photograph of the subject (remember to use references), human or otherwise, close your physical eyes and use your astral sight to attempt to reconstruct what you just saw, as three-dimensional shapes. Entirely replicating what you see can be too hard at first and is also not the point here, so using your astral vision forces you to comprehend and construct something while also using both your creativity and intuition, as they tell you what stands out the most to you, and how to recreate it.

Construction will also help in visualizing things in perspective, which leads us to the next fundamental.

#3 - Perspective  (Wind Elemental)  (Lv.3)  (Arguably level 666 or something once you cross into advanced levels...)

Perspective is the construction of the surrounding environment in which the subject is depicted, and also the space and distance perceived based on what is shown to be nearer, and farther away to the viewer. ...Yeah. This is a monster that scales with your own level, so it will almost always be difficult regardless of your level of advancement.

For now, let's just talk about how perspective can be incorporated into drawing characters. Backgrounds and the like are for the next chapter zone.

Understanding perspective is fundamental in depicting your subject in both a convincing and visually appealing manner, as we begin to include how the viewer visually perceives the subject in space, and this can possess a major impact in the expressiveness and mood of the illustration. You may have heard of foreshortening, which is typically when part of the character seems to reach out towards the viewer, like their hand, or foot. This is already somewhat advanced usage of perspective on the character alone, excluding how perspective can be used for backgrounds and the like, too.

Similarly to film and photography, a character viewed from somewhat far away can create a feeling of distance, or isolation. Whereas a close up, perhaps diagonal shot of the character's face can be much more impactful and dramatic in conveying their emotions, and expression. This is one example of the usage of perspective to convey different moods.

Here is an example displaying how different angles of the same general action and character, can create very different expressions depending on the artist's usage of perspective:


(Source: Wacom tutorials)

One way to familiarize oneself with incorporating perspective into one's illustrations, is to practice drawing 3d shapes and objects in different angles. Eventually, you will want to apply this to poses, and try to draw the same pose at 3 different points of view . This will also massively help later on, where you're drawing out random ideas and then choose 1 to finalize into a full illustration.

What we know as a "focal point" is the focus of the scene, towards which our eyes are drawn first and foremost, and what we wish to present to the viewer as the main subject of interest. This can be anything that serves as the center of attention amidst the rest of the scene. This could be the face, eyes, the weapon reaching out towards the viewer, etc.

In the case of my own art, it's often the chest and butt HAHAHAHA (oh, fuck...)

Unique ability usage: When you're drawing a pose from different angles, you can, once again, actually use your astral vision to surmise what something would look like from a different perspective. Not just see, but if you use Merging Consciousness, you can actually feel and experience anything you want.
This is really, really hard for normal people, but we've undergone the spiritual training to gain these abilities, which grants us a massive edge over anybody. (Something even harder is to feel yourself in the pose and sense where the centre of gravity leans the skeletal structure to determine the flow of the spine, angle of the hips, and positions of the feet, but that's some next level shit...)

Of course, you should still use references when you can, and a tip for poses is to use 3d models that you can turn around and see from other angles. Effective sites for this are PoseManiacsExternal ↗ once again, and surprisingly, SketchFabExternal ↗.

SketchFab is actually supposed to be used to purchase 3d models, but we're really just using it to inspect stuff and practice drawing. You can search for something, click something you like, and turn it around at different angles, zoom in and practice for all your studies.

#4 - Anatomy  (Wooden Training Doll) (level 4)

With the previous fundamentals, especially #2, construction, learning anatomy actually becomes a lot easier than it might seem. Some (many?) of us already have experience in physical training and/or martial arts, or even TCM (Hi, Blitz!), so we might be more familiar with the muscular system.

Regardless, when we research the muscular and skeletal structures of the human body for artistic purposes, we can simplify areas of the body into simpler shapes, that help us understand the structure to a more easily comprehensible degree. However, the difference with actually knowing anatomy, is that simplification is really for the purposes of establishing an initial understanding of the complexity of the human body. Most of us do not stop at the simplification, but carve and detail it further to resemble the muscles we intend to draw.

Here's an example of a color-coded portrayal of the muscles in the forearm. Previously, one might have simplified the forearm as a cylinder or bottle shape, but as we can see, there's a lot more going on inside.


(Source: Pinterest)

Now, you might be thinking, "Remembering muscles sucks. Do I really need to know anatomy to draw characters?"

Actually, no, you don't. One of us in my field was a woman who is a professional artist, and hadn't picked up an anatomy book until she was in college (but she still did in the end, right?). She had gone by shapes and construction entirely, and the rest of the fundamentals, without really knowing muscular structure or anything of the like. So technically, no, you actually don't need to know anatomy in order to draw characters (to an extent).

However, you are in my opinion crippling yourself when it eventually comes to situations where you might wish to vary the kinds of characters you draw, or the extents of detail you wish to draw their body at, which also depends on the genre and theme of your art.

More realistic styles such as those often seen in horror, action, and sexual art, where there is much emphasis on the body and details included, do absolutely require anatomical knowledge in order for the intended atmosphere or resonance to be conveyed in a convincing manner towards the viewer.

Even potentially more simple art styles, where the intention is to portray a fragile, cute character, the artist still possesses the actual anatomical knowledge most of the time, but specifically decides to simplify it for the sake of the target resonance of the character. If they didn't have the knowledge in the first place, every character would generally have the same body type, including characters of the opposite gender.

Basically, learning anatomy is for the sake of understanding the structure beneath that which you see, and will only further enhance your comprehension of whatever characters you intend to draw, adding more opportunities and variation. It's a very useful skill, and you could purposely choose not to use it, but having it and not using it is different than straight up not having it!

Since we're talking about drawing human characters, it would be to our benefit to understand the structure of the human body. When you feel like you have attained a comprehensive understanding of muscular anatomy, try studying the skeletal structure, as well. Muscles are connected to the skeleton, after all! This will also help in gesture drawing and posing, to understand how the muscles of the body stretch and turn, resulting in some very natural, beautifully dynamic poses.

PoseManiacsExternal ↗ has a function where you can toggle color-coded appearances of the muscles when viewing the anatomical models, allowing for easier visibility. We didn't have this back when I started, so make the most of it!

#5 - Lighting and Shading  Dark/Light Elemental (Lv. 5)

Another important fundamental in art, is the understanding of light and shadow. Lighting and shading allows us to establish vivid form and dimension in a subject, and it is what allows it to feel as though it truly looks to be present, despite it being in a 2-dimensional illustration. Essentially, it gives form and a sense of realism to something.

Here is an example of the basics of lighting and shading upon a sphere:


(Source: Pinterest)

Plainly, shadow is where light does not reach, but this is actually not entirely true. When light shines onto another surface or color in the immediate environment, the light that bounces off of it can actually seep into the shadow as a colored form of light, and this is called bounce light, or reflected light. Although black and white, you can see the slight, soft arc of light around the outer edge of the shaded area despite it being the opposite side of the light source. If you were to imagine a pearl on a metal surface, you would see a similar effect.

Now, since a sphere is round, the light that shines upon it will disperse across its curved surface, causing the shadow to resemble a gradient of light and shadow, rather than a sharp, abrupt transition as would occur with a cube.

To familiarize yourself with lighting and shading, practice drawing and shading several 3d shapes such as spheres, cubes, cones, and rectangles. You will quickly come to understand how light and shadow appear differently (or similarly) on each of these shapes, such as in the following example:


(Source: Pinterest)

As well as here:


(Source: Pinterest)

When you've become familiar with shading 3d shapes, you can move towards applying lighting and shading techniques onto characters, starting from the face, hair, and body. When you begin applying shadows to characters, you will discover the interesting effect that shading has on the overall impact, and mood of the expression and scene...

Although the examples from here on out are of digital art and coloring, the same elements of color, light and shadow apply to traditional art, as well. This is visible in many old, famous paintings of realistic portraits.


(Source: Pinterest)

The following example is part of a guide on a Japanese site and includes some notes. I'll provide translation.

(The images are from right to left; right being before, and left being after applying shading.)

"On a Multiply layer, cover the hair, face, body, everything and blend the shading, then reduce transparency. Reduce level of shading wherever you like."
(arrow) "Reducing it like this over here, adds a sense of atmosphere" (which it does; the power of bounce light. That slight, lighter purple could've been blue to add a sense of general air or sky, but this is entirely up to the artist's intentions)


(Source: https://ichi-up.net/2020/15External ↗)

As well as the following.

"On a Hard Light layer, paint a color with high saturation (usually red for skin) on the boundary where light and shadow meet."


(Source: https://ichi-up.net/2020/15External ↗)

She's talking about SSS; Sub-surface Scattering. This is a lighting and coloring technique where when light seeps through a surface, it carries that subject's color through the shadow until a certain range. You'll see it when you put a flashlight against your hand and see the red of your flesh shine through the opposite end.

Example:


(Source: bgates87 (lmao))

As you can see, there's a highly saturated red, right at the boundary between where hard light hits, and the shadow begins. This does not always have to apply, especially when the light isn't that strong, but it is a huge factor in establishing a strong lighting effect.

It also doesn't have to be red; it's only red because the subject is human skin in the previous examples. Try to imagine what color would permeate the shadows of a blue water balloon, or on a tree surrounded by green or even orange leafs.

No unique ability usage for us that I can think of this time, as it's relatively straight-forward.

Now... onto my favorite part...

#6 - Color Theory (BOSS FIGHT!!)  Rainbow Slime  (Lv. 6)

Hahaha. Where do I even begin?

Color theory conveys the idea that certain zones of the color wheel, and particular color combinations at specific angles and ranges result in colors that will always be visually and emotionally pleasing to the human eye. It is almost objective, which doesn't exist in art, but if you pull off color theory from the beginning, something can look good even if the rest of the illustration looks like shit, basically. That is the power of this fundamental, and many people tend to overlook it, especially in the beginning.

In fact, we even have professionals who don't know color theory. Of course, it's an artist's decision whether or not to incorporate it into their art, and there are some cases where it doesn't work, such as when someone wishes to use darker, less saturated colors to convey more of a purposely dull and somber atmosphere. Nevertheless, it is still incredibly important to know, and among an artist's strongest weapons (and even stronger when it's us who wield it)

Allow me to provide a few general example combinations of color theory.


(Source: ...the web)

At first sight, it might be daunting to see how many different types of colors we can use in our art, for different kinds of moods and feelings. As we out of all people should know, different colors have different properties, and each resonate a particular feeling or quality. What's interesting, though, is that this can even be felt by normal humans, because all humans have a deep, primal, spiritual connection to colors due to our chakras and soul, as the soul is made of light and color is how light is broken down for our vision to perceive, all this be known or not to regular people.

Meaning you can evoke any intended atmosphere or feeling in your illustration through mastery over color theory, allowing you to basically control what emotions you want the viewer to feel when they look at it, through the usage of the colors in your drawings. It's fucking crazy if you think about it. Let this be a major upgrade to your skill level and stats.

Earlier, I showed several of the main color combinations. Truth is, even I haven't used half of those, and coloring is my strongest area. You can eventually try them all out if you wish, for experience, and see which one suits a particular scheme that you resonate with, but the bottom line is: you can get away for eternity with really just the Triadic and Complementary type. Or two others of your choice. That's all there is to it, for the most part.

For beginners, when you're shading and coloring your illustration (on a Multiply layer), as long as you shade with a color that is 1/3rd counter-clockwise to the base color, you're done.

Here's a simpler version of color theory that may be of benefit to those who prefer starting out with something easier:


(Source: Youtube Thumbnail)

As you can see, we have warm colors, and cool colors. These are colors that our senses mostly attribute to what we perceive to be hot (red, yellow, orange), and cold (blue, green, and purple). This is the reason why red is considered lively, whereas blue can be sad or solemn.

Of course, the effects of a color depends on many different factors, such as the saturation level, surrounding colors, which "side" of the color (dark, mossy green towards blue, or bright, happy green towards yellow), but as I said, this is simply to establish some basic understanding for one who is just starting out.

Nothing is ever just it on its own, in art; everything is subjective, and can change as a result of anything else in the illustration.

Unique ability usage: Before coloring your painting, or starting your drawing for that matter, void meditate and begin to feel what kind of emotions you wish to spill into your drawing. The emotions you feel and the sensations that arise, will define what kind of color scheme and the levels of saturation, contrast, etc. you can use to convey such emotions to the fullest. I personally have had people physically jolt and experience chills from some of my most strongly colored works, as a result of the emotions I cascaded into it; it was tangible to even normal people.

Conclusion

As I mentioned in the beginning of this long post, many of us possess a creative desire to try drawing and painting, but might not quite know where to begin. I believe that the creative potential we possess as not just humans, but Zevists, must be allowed to be expressed through a medium that pertains to our desires, and allows us to evoke that which resides in our hearts and creative minds.

If that happens to be the path of illustration, I dearly, strongly hope with all my soul that one of you may pursue and find your path as an illustrator as a result of this post I made. From the effort I finally stuck into helping people with my knowledge here. I mean that with all my identity.

There are one or two more fundamentals I may have forgotten, but with these six, a beginning artist right out of the gate should be able to start working on developing everything they need. It is also important to note, that these fundamentals, all in combination are what will eventually perfect your artistic abilities.
Leaving or skipping them out will lead to breaks and gaps in your output, even as someone advanced and above; I've experienced this myself, and have had to return to fix these very basics I just laid out for new artists.

Although this might sound somewhat overwhelming, everything I wrote in this post, is actually only a glimpse of all else I still have to say. Remember, this was just a guide for beginners, LOL.

Upon defeating the Rainbow Slime, and grinding all the fundamentals for maybe a year (or two), I will welcome you to the next chapter, where much more awaits you as an intermediate artist by then. And beyond that, you can only guess what else...

Thank you so much for reading everything; it took me 10 hours to write all of this. May you advance in not just art, but spiritual powers as well, the very ones we can use to rapidly accelerate our growth in this field, using our mind's abilities.

If there is anything anyone wishes to ask me, or if there are already experienced artists who wish to request guides for higher level issues, please tell me about what struggles you may be facing in art, and I might create new threads on some of the most common walls we all face as artists.

thank you 🤩

Henu the GreatActive Helper
#28

This post is/was the final catalyst to finally move toward doing what I need to do, to practice artistic pursuits. I have read this before, but the time was not right, I think, back then. Nevertheless, I would love to compile all the posts to a one neat PDF file and post it here. The topic seems quite conclusive, but I must ask, will you add something else? Not that you must, just wondering.